Hey John, My hat's off to you for that diorama shot ! Starts with beautiful model building, car looks dead on real, ...no giveaways at all. Then a realistic beautiful background (tough...), then perfect lighting and realistic angle, and proper depth of field on the entire subject all collectively round out an image that most viewers would just generally accept as real ! Absolutely stunning work all the way through the process !!!!!!!!!!!!!!!!!! You have totally suspended any disbelief....
And Rich, beautiful work as well. Real racecars are shot this way all the time, so very realistic too, but depicting a studio shoot or preseason press release of a new car. I love the dramatic black background and crisp color.
Nice nice work gentlemen, my compliments to both of you !
Best,
Steve Mohlenkamp
Shooting the perfect model shot
-
 plastiksurgeon
- Team Owner

- Posts: 894
- Joined: Tue Jun 27, 2006 9:22 am
- Location: Denver, Colorado
- Contact:
- Status: Offline
Re: Shooting the perfect model shot
when I was young, all the boys made model cars, ...some of us just never stopped !
-
 racingkars
- FOTA Chairman

- Posts: 2379
- Joined: Mon May 21, 2012 1:55 pm
- Favorite F1 Team or Driver: Ferrari
- Location: Assen; The Netherlands
- Contact:
- Status: Offline

Re: Shooting the perfect model shot
john-w wrote:Hello,
here is a photo from my Matra MS80, MFH 1/20th
John-w
John, For some reason i always think your pictures are the best (without offending anyone).
I just like this pitbox views.
I have plans to build something like it in future.
Could you inform me of sizes of your pitbox? Is it for scale 1/20?
Kars
http://www.racingkars.nl (WIPs)
http://www.racingkars.com (sales)
Websites in Nederlands/English
English is not my native language, so sorry for any incorrect words or style... I have no intention to offend you.
http://www.racingkars.nl (WIPs)
http://www.racingkars.com (sales)
Websites in Nederlands/English
English is not my native language, so sorry for any incorrect words or style... I have no intention to offend you.

Re: Shooting the perfect model shot
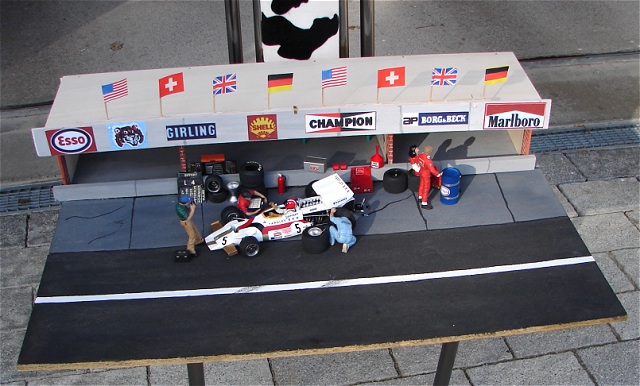
This pitbox is appr. 50x70cm and in scale 1/20thalien9998 wrote: Could you inform me of sizes of your pitbox? Is it for scale 1/20?
Baseplate with different flooring.
Complete pitbox.
Appr. 25 years ago I have built trucks in scale 1/25 and here is a similar diorama for photos only.
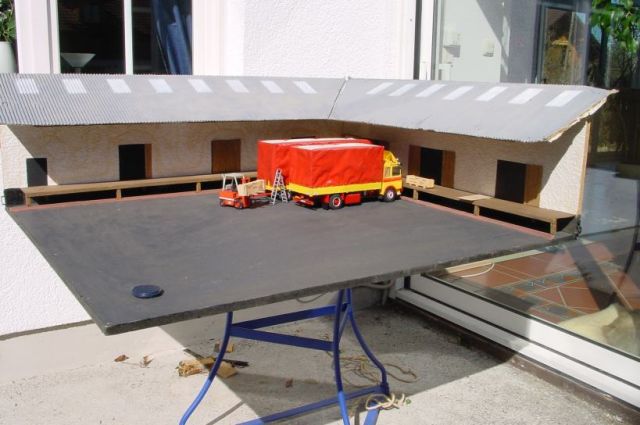
Please note this truck is in scale 1/25th and appr. 125cm long, watch the depth of field.

John-w
-
plastiksurgeon
- Team Owner
- Posts: 894
- Joined: Tue Jun 27, 2006 9:22 am
- Location: Denver, Colorado
- Contact:
- Status: Offline
Re: Shooting the perfect model shot
These images of a 1/20 Ferrari F2000 were made last week before the model gets forever ingested by a twenty man pit crew servicing the rocket. Knowing the final diorama will see the crew around the car like a swarm of locusts, and some of those fine lines will never be again seen in their entirety, I threw some SMS wheels from the impending dio on for the first time (this model has always been tagged for a pitstop diorama, thus has never seen wheels !) and shot 'er as just a car. Then I added motion in photoshop. I will shoot and post the full diorama soon, but don't expect twenty fully painted figures, ....this is a second in line to another dio I built with all white figures (97 of them on that one), (I call it my HumanRace Series) and so to follow suit,these figures too will be, ....flat white.
I just thought I might enjoy a pic or two of just the car by itself. These images were not created to look "real", but rather for a book project of my models to be printed online at http://www.blurb.com, and just to have as normal stock images of my models.
THE SETUP: One light source from directly above, medium brightness (...with light, quantity does not always equal quality) spread out to the size of a queen size WHITE bedsheet hanging below the light and above the model to diffuse (soften )it, and it also spreads the light to a large light source, the secret to soft creamy reflections, instead of those harsh pinpoint reflects. Essentially the bedsheet not only softens the direct light, but it also turns the lightsource itself from one bright lightbulb into a 4foot by 6foot source of light, bathing the subject in an almost shadowless soft blanket of light...all the difference in the world. From there, you can bounce light into wheels and under sides of the car to fill the shadows cast by overhead light, done with little mirrors, pieces of white foamcore board (any frame shop) or anything else reflective that will redirect the overhead light into your shadowed areas. You can also use small flashlights or other small light sources to open shadows, but be careful not to overdue the fill light or it will look fake. The combination of the soft overhead huge light source and the bounced in detail light will give you a combination of lighting that is the basic lighting setup of most professional studio shoots. THE BOTTOMLINE: ...main light source diffused and as big as possible above and slightly behind the subject, with bounced in light to the front and sides of the subject. Simple, but magic in practice.
Best,
Steve Mohlenkamp
when I was young, all the boys made model cars, ...some of us just never stopped !

Re: Shooting the perfect model shot
Great stuff guys - some fine ideas coming out here!
John-W - that is a very nice photo ( and model )! I really think that creating a diorama or backdrop with models to add a bit more atmosphere. However, there is still something about it that gives it away to be a scale model to the trained eye...
I also think that using natural light really helps - shadows are real, and sunlight is of course the best for shooting to get good contrast and colour.
Here's another example of an idea I tried - using a backdrop to complement the model and try to make it look a bit more real:

Steve - those shots are also great, and thank you for the compliments! I do like how you have used ambient light in your images to get that lovely wholesome, warm appearance to your shots - certainly adds plenty of depth and realism to the images, accentuating the car.
Certainly more food for thought!!
And John-W - I couldn't resist seeing what your "complete pit box" image would look like with a bit of photo-manipulation...I hope you don't mind. I added some Tilt-Shift effect, which is often used to make real life photos look like miniatures.
You could be onto something there!

John-W - that is a very nice photo ( and model )! I really think that creating a diorama or backdrop with models to add a bit more atmosphere. However, there is still something about it that gives it away to be a scale model to the trained eye...
I also think that using natural light really helps - shadows are real, and sunlight is of course the best for shooting to get good contrast and colour.
Here's another example of an idea I tried - using a backdrop to complement the model and try to make it look a bit more real:
Steve - those shots are also great, and thank you for the compliments! I do like how you have used ambient light in your images to get that lovely wholesome, warm appearance to your shots - certainly adds plenty of depth and realism to the images, accentuating the car.
Certainly more food for thought!!
And John-W - I couldn't resist seeing what your "complete pit box" image would look like with a bit of photo-manipulation...I hope you don't mind. I added some Tilt-Shift effect, which is often used to make real life photos look like miniatures.
You could be onto something there!
------------------------------------------------------------------

-
 vanhookvintage
- FOTA Chairman
- Posts: 2121
- Joined: Sun Sep 16, 2012 4:34 pm
- Your Name: vanhookvintage
- Favorite F1 Team or Driver: Ferrari
- Location: Upper Black Eddy, PA USA
- Status: Offline

Re: Shooting the perfect model shot
I'm still experimenting here, and every comment helps. I'm still using the lightbox I built Friday night with the white bedsheet for diffuser and backdrop (sorry, still dirty and not ironed). I bought some backdrop paper on Saturday, but it is so rainy and humid here (humidity 75 - 100%), that I don't dare try to cut it - like paper mache. And, it was impossible to experiment shooting outside in ambient light.
I tried to use some of your tips, Steve, and John-W, that photo is just incredible, due mostly I think to the build quality you've done.
I thought I'd practice on a 1/20 model, a Williams I built in 1996 (the decals are yellowing). I moved my top light close to the top of the box, and behind the model, and hooked a light to my tripod (both halogen bulbs in everyday aluminum reflectors) to try to light up the low parts of the car. And I used my SB-400 flash, mounted on the camera to hopefully make it pop - The SB-400 and D70 are not set up for any kind of remote tripping.
ASA (oops ISO) 100, 1/15 second, f16. I still had to manipulate the image to bring up the shadows. I've noticed with this camera that the shadows are often black and featureless. I don't know what to do about that, but I never had that problem with film.
Anyway, just another shot put out there for critique, and hopefully at least a a small improvement.
Cheers,
Greg
- Attachments
-
"Everyone dreams of driving a Ferrari, it was my intent from the start." Enzo Ferrari
-
 Jeep
Jeep
- Constructors Champion

- Posts: 1375
- Joined: Mon Mar 03, 2003 7:29 pm
- Your Name: Jean-Pierre Bastien
- Favorite F1 Team or Driver: Alain Prost
- Location: Montreal
- Status: Offline

Re: Shooting the perfect model shot
Excellent work for the depth of field!!!! (But the out of scale leaves in the back give the game away.john-w wrote:Please note this truck is in scale 1/25th and appr. 125cm long, watch the depth of field.
Jeep
The Walter Wolf WR-1 Home Page
http://WolfWR1.free.fr
The Ferrari 312T4 Spotter's Guide
http://bit.ly/10f3Vtj
The Ferrari 126C2 Spotter's Guide
http://bit.ly/1oxy29H
Gilles Villeneuve's McLaren M23 Spotter's Guide
http://bit.ly/1VZFAkJ
Gilles Villeneuve's Ferrari 312T3 Modeller's Guide
https://bit.ly/2l5z6Ia
Re: Shooting the perfect model shot
Hey Greg,
A question for you ( and something for you to read up on )
How is your camera metering the image ?
By that I mean, which are of the image is it measuring the light in the shot, as this will govern contrast, colour balance and brightness.
On your camera, you should have a way of adjusting the metering - it;s usually a three step tool, that will offer full frame metering, center weighted or spot metering. you might need to look through the manual to find it.
Try shooting on each of these settings and see what difference it makes.
Also - get closer to the model, and use and area of high contrast ( black and white ) to focus and meter ( half press on the trigger )
let me know if you have any joy
Rich
------------------------------------------------------------------
Re: Shooting the perfect model shot
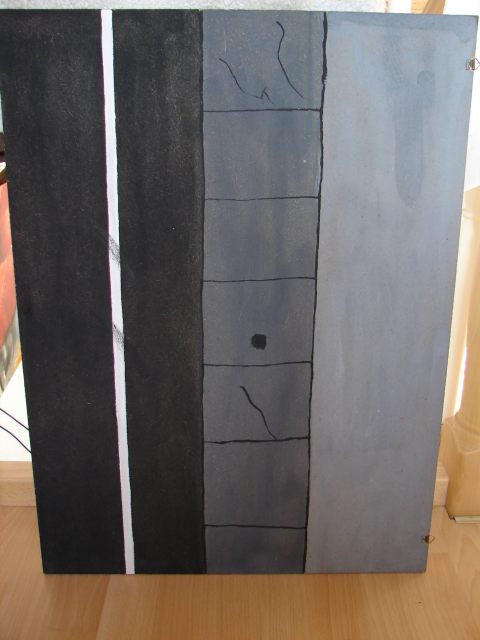
Ok, so I have just finished my Benetton model, and want to try and get a few different images of it to show it off...
So I had a go at Steve's technique...

What do you think ?
I couldn't get the exposure time correct, so had to up the exposure digitally to get the best colour - but I'm not convinced. It's lacking the dynamics and KAPOW that a image taken with flash guns or hard light has.
The highlights are too soft, and shadows too gentle.
Although I do like how the the longer depth of field keeps the whole car in focus...
Feedback and opinion please
Rich
So I had a go at Steve's technique...
What do you think ?
I couldn't get the exposure time correct, so had to up the exposure digitally to get the best colour - but I'm not convinced. It's lacking the dynamics and KAPOW that a image taken with flash guns or hard light has.
The highlights are too soft, and shadows too gentle.
Although I do like how the the longer depth of field keeps the whole car in focus...
Feedback and opinion please
Rich
------------------------------------------------------------------
-
 SeaBee
- Top Designer
- Posts: 739
- Joined: Thu Jan 08, 2004 6:17 am
- Location: Paarl, South Africa
- Status: Offline
Re: Shooting the perfect model shot
Rich, I really like it. maybe that's because I do not like the harshness of flash photos.
Don't know if it was intentional or not, but the one thing I'd have changed is to zoom more/get closer/crop to get rid of some of the vast black expanses. (But I'm thinking you left it there just for an example?)
Greg - this is also a good example of what he meant by the exposure mode. Had he gone full frame exposure mode, the black would have "fooled" the sensor and the shot would have been overexposed. Pretty sure Rich would have used center or center-weighted on this. That way the exposure is measured on the info from the car and the black surrounds is discarded for measuring.